
Code optimization
There are several aspects you can optimize in your scene’s code to ensure the best possible experience for players who visit them. This document covers some best practices that can make a big difference in how fast your scene loads and how smoothly it runs for players that are on it or on neighboring scenes.
See Art optimization for more information on how to optimize your scene’s art.
Keep in mind that many players may be visiting Decentraland using hardware that is not built for gaming, and via the browser, which limits how much of the hardware’s processing power is available to use. The experience of visiting your scene should be smooth for everyone.
Monitor Performance #
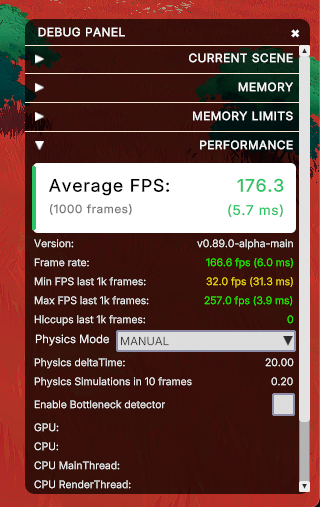
The best metric to know how well a scene is performing is the FPS (Frames Per Second). When running a scene in preview, open the debug panel to see it. You should aim to always have 30 FPS or more.
To see the current FPS (Frames Per Second) of the explorer
- Open the debug panel, on the top-right corner of the screen.

- Check Average FPS in the PERFORMANCE tab.
Check this value periodically, as it may vary over time depending on what you’re doing in your scene.
Keep in mind that the performance you experience in preview may differ from that in production:
- Surrounding neighboring scenes might have a negative impact
- If multiple players are in the scene, rendering all their avatars can have a negative impact on the FPS
- The compression of the scenes’ 3D models into asset bundles can have a positive impact
- Some players visiting your scene may be running on less powerful hardware
It’s always a good practice to try deploying your scene first to the test environment to do some more thorough testing.
Always ask players for feedback. Never take for granted that how you experience the scene is the same for everyone else.
Video playing #
Playing videos is one of the most expensive things for the engine to handle. If your scene includes videos, make sure that only ONE VideoTexture is in use at a time. You can have dozens of planes sharing the same VideoTexture without significant impact on performance, but as soon as you add a second VideoTexture, its effects on framerate become very noticeable.
You should also avoid having videos playing in regions where they can’t be seen. For example, if you have a screen indoors, toggle the video using a trigger area based on when the player walks in and out.
💡 Tip: A trick several scenes have used is to stream a single video with multiple regions that are mapped differently to different planes. Each video screen uses UV mapping to only show a distinct part of the VideoTexture. Thanks to this, it can appear that there are separate videos playing without the cost of multiple VideoTextures.
💡 Tip: When players are standing outside your scene, VideoTextures are not updated on every frame. This helps reduce the impact for surrounding scenes. It’s nevertheless ideal only turn on the playing of any videos when players step inside your scene .
Lazy loading #
If your scene is large, or has indoor areas that are not always visible, you can choose to not load the entire set of entities from the very start. Instead, load the content by region as the player visits different parts of the scene. This can significantly reduce the load time of the scene, and also the amount of textures and 3D content that the engine needs to handle on every frame.
For example, the main building of a museum could load from the start, but the paintings on each floor only load for each player as they visit each floor.
See this example scene for how that might work.
For the best result in terms of avoiding hiccups, hide entities by switching their shape’s visible property to false. With this approach, you add them to the engine when creating them, but you simply don’t make their models visible.
An alternative is to not add the entities to the engine until needed. This may result in some hiccups when the entities appear for the first time, and they might also take a couple of seconds to become visible. The advantage of this approach is that it’s a valid way to get around the scene limitations . Keep in mind that the scene limitations count is for the content that is being rendered in the scene at any given time, not for the total content that could be rendered. Loading and unloading parts of the scene should allow you to work around those limitations.
📔 Note: Entities that are not visible but are added to the engine do count towards the scene limitations.
You can also toggle animations on or off for entities that are far or occluded. For example, for an NPC that plays a very subtle idle animation, you could make it only play that animation when the player is at less than 20 meters away. Use a trigger area around the NPC and toggle its animations on or off accordingly.
💡 Tip: When an entity is far away and small enough, it’s culled by the engine. This culling helps at a drawcall level, removing entities from the engine is always better. This culling also doesn’t take occlusion by other entities into account, so entities that are not so small but hidden by a wall are still rendered.
Mutable vs non-mutable data #
When dealing with data, you can choose to deal with mutable or with immutable (read-only) versions of a component. The .get() function in a component returns an immutable version of the component. You can only read its values, but can’t change any of the properties on it. See
mutable data
for more details.
The .getMutable() function returns representation of the component that allows you to change its values. Use mutable versions only when you plan to make changes to a component. Dealing with immutable versions of components results in a huge gain in performance.
const immutableTransform = Transform.get(myEntity)

// the following does NOT work:
// immutableTransform.position.y = 2

const mutableTransform = Transform.getMutable(myEntity)

// the following DOES change the entity's position
mutableTransform.position.y = 2
It’s especially useful to deal with immutable versions of data when iterating over a lot of entities, and especially if the data is not changing. For example, if you’re iterating over all the entities in the scene and checking their position, you can use the immutable version of the Transform component to read the position, and only fetch the mutable version when you need to change the position.
Async blocks #
Blocks of async code are processed in a separate thread from the rest of the scene, to prevent blocking the progress of everything else.
Any processes that rely on responses from asynchronous services, such as getPlayerData() or getRealm() should always run in async blocks, as they otherwise block the rest of the scene’s loading while waiting for a response. The same applies to any calls to third party servers.
Note that the scene will be considered fully loaded when everything that isn’t async is done. Async processes might still be running when the player enters the scene. Avoid situations where an async process results in the loading of an entity that could potentially get the player stuck inside of its geometry.
Rely on Events #
Try to make the scene’s logic rely on listening to events as much as possible, instead of running checks every frame.
The update() function in a
system
runs on every frame, 30 times per second (ideally). Avoid doing recurring checks if you can instead subscribe to an event.
For example, instead of constantly checking the player’s wearables, you can subscribe to the onProfileChanged event, and check the player’s wearables only when they’ve changed.
Likewise, you can use the onChange() method to subscribe to changes in any component, and only run the check when the component’s value changes. See
Subscribe to changes
for more information.
MyComponent.onChange(myEntity, (componentData) => {
			console.log(componentData.value1)
		})
📔 Note: Do not use onChange() inside a System, as that would subscribe a new copy of the function on every frame of the game loop, and could potentially lead to crashes.
You can also combine this approach with Querying components , to bulk-subscribe every entity in the scene that has a certain component to their own function.
export function main() {
	for (const [entity] of engine.getEntitiesWith(MyComponent)) {
		MyComponent.onChange(entity, (componentData) => {
			if (!componentData) return
			console.log(componentData.value1)
			console.log(componentData.value2)
		})
	}
}
If you must use a system, avoid doing checks or adjustments on every single frame. You can include a timer as part of the update function and only run the check once per every full second, or whatever period makes sense.
Connectivity #
If your scene connects to any 3rd party servers or uses the messagebus to send messages between players, there are also some things you might want to keep in mind.
- Your scene should only have one active WebSockets connection at a time.
- HTTP calls are funneled by the engine so that only one is handled at a time. Any additional requests are queued internally and must wait till other requests are completed. This queuing process is handled automatically, you don’t need to do anything.
- When using the messagebus to send messages between players, be mindful that all messages are sent to all other players in the server island. Avoid situations where an incoming message directly results in sending another message, as the number of messages can quickly grow exponentially when there’s a crowd in the scene.
Scene UI #
Scene UIs can become costly to render when they are made up of many individual elements. Keep in mind that each UI element requires a separate drawcall on the engine.
💡 Tip: Try to merge multiple elements into one single image. For example if you have a menu with multiple text elements, it’s ideal to have the text from the tiles and any additional images baked into the background image. That saves the engine from doing one additional drawcall per frame for each text element.
Avoid making adjustments to the UI on every frame, those are especially costly and can end up getting queued. For example, if there’s a health bar in your UI that should shrink over period of time, players would probably not notice a difference between if it updates at 10 FPS instead of at 30 FPS (on every frame). The system that updates this bar can use a brief timer that counts 100 milliseconds, and only affect the UI when this timer reaches 0.
Avoid having many hidden UI elements, these also have an effect on performance even if not being rendered. When possible, try to create UI components on demand.